App smashing can be a lot of fun for you and for your students. It takes some very important rules to work successfully and for you to end up with an amazing finished product. Keep on reading for tips and tricks for launching App Smashing Projects in your classroom!
What is App Smashing?
Are you wondering what app smashing even is? The definition of App Smashing is using multiple apps in conjunction with one another to complete a final task or project. It uses multiple apps that students are familiar with and saving individual pieces along the way. Then, you add all of those individual pieces together to get a final product.You always want to start with the end goal in mind. Tell your students what they want to achieve, how much time they have to achieve it and how to submit it when they are finished. Rules for Apps Smashing:
1. Limit to 3 Apps
Too many apps can be frustrating to students. I limit my students to just using 3 apps (still allowing them choice). Make sure you have plenty of apps that save to the camera roll. If not, you can always have them take a screenshot and then crop the photo.
2. Limit Time to 10 Minutes/App
This is the hardest part about App Smashing. You can get really carried away with all the different things your brain is coming up with while you are creating. I usually give my students about 30 minutes total to create something. This divides out to be about 10 minutes per app. Every ten minutes, give a warning so students can gauge their work.
3. Allow Student Choice
Students are going to be comfortable with a variety of different apps. By allowing student choice, you are giving your students the ability to work with what they know to really “wow” you with their skills. You could list various apps on the whiteboard so they know what their choices are. Another way you could regulate what apps students use is by making a tic-tac-toe board with 9 different apps. Students must choose three apps that form a line during their app smash project.
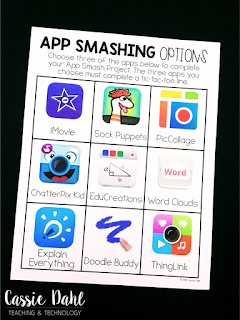
Want this App Smashing Options tic-tac-toe board? Click here to download for free!
4. Allow Creativity to Shine
What you think “looks good” and what students think “looks good” are two totally different things! You have to be willing to accept if something is not centered or easily readable (they like the funky fonts). The more they practice using different apps, the better they will get at them. Make sure you have examples of finished projects on hand for your students to reference. You will find that students will gravitate towards apps that they know the best. Sometimes you will need to help them get out of their comfort zone by assigning one of the three apps so they get familiar with it.
5. Require Audio and Images
This is an optional rule. I always like to hear my students’ voices. There are so many apps that will allow them to record themselves. I tend to require both audio and images (and even video from time to time) on each App Smash project. Make sure you discuss with students about good recording practices. Things like slowing down when they are reading, taking a breath before they run out of oxygen, practicing before recording, being quiet while someone around them is recording, etc. are important things to discuss. My students have found different nooks around my room that they like to “hide” in while they are recording.
Saving and Sharing
The best part about creating App Smash Projects is each of your students will create something different. At the end of the assignment I have my students share their work with me. Depending on what app they are using, they might send me an e-mail link or upload their work to our class SeeSaw account.
When everyone is finished, we spend about fifteen minutes sharing. I allows students to airplay their devices to our SmartBoard to show their work. They explain what apps they chose to use, show their work and then take one question and one comment. It is a great way to hold students accountable. Not all of them will share, but as they get more comfortable with their abilities, you will find them wanting to share more frequently!
So there you have it! You are ready to App Smash like a Superhero! In the next few weeks, I will be posting various apps that Smash well together. Each post will have two to three apps with a quick tutorial for each and an example project for you to complete in your classroom!
Make sure you are signed up for my Newsletter or follow my Technology Inspiration Pinterest Board so you don’t miss out!
SaveSave

